
Introduction
In the ever-evolving world of Clash Royale, the Golem Clash Royale remains one of the most iconic and powerful cards available. As a tank behemoth with devastating potential, the Golem Clash Royale has consistently maintained a strong presence in the meta across various arenas and competitive tiers. When properly supported and strategically deployed, a Golem-based deck can turn the tide of battle, overwhelm defenses, and secure three-crown victories with brute force. This comprehensive guide delves deep into the intricacies of the Golem Clash Royale deck, exploring its strengths, variations, strategic execution, and how to master it against various matchups. Whether you’re a seasoned veteran or an aspiring beatdown player, understanding the mechanics and nuances of the Golem deck is key to achieving dominance in the Arena. Please visit this.
Understanding The Core Of The Golem Deck
The Golem serves as the primary win condition in the deck, known for its slow movement and immense health pool. Its death damage and spawned Golemites add a layer of residual threat that forces opponents to constantly manage their defenses. A Golem Clash Royale deck typically revolves around building a massive push behind the Golem, using support troops to clear away defenders and amplify the offensive power. Due to the Golem’s high elixir cost, managing your elixir economy and creating positive trades in the early game is crucial. The ideal gameplan for Golem decks is to survive the first two minutes by defending efficiently, then capitalize on the Double Elixir phase by building unstoppable pushes that overwhelm opponents. Success with the Golem deck requires patience, timing, and strategic coordination of support troops to unleash its full potential.
Best Supporting Cards For The Golem
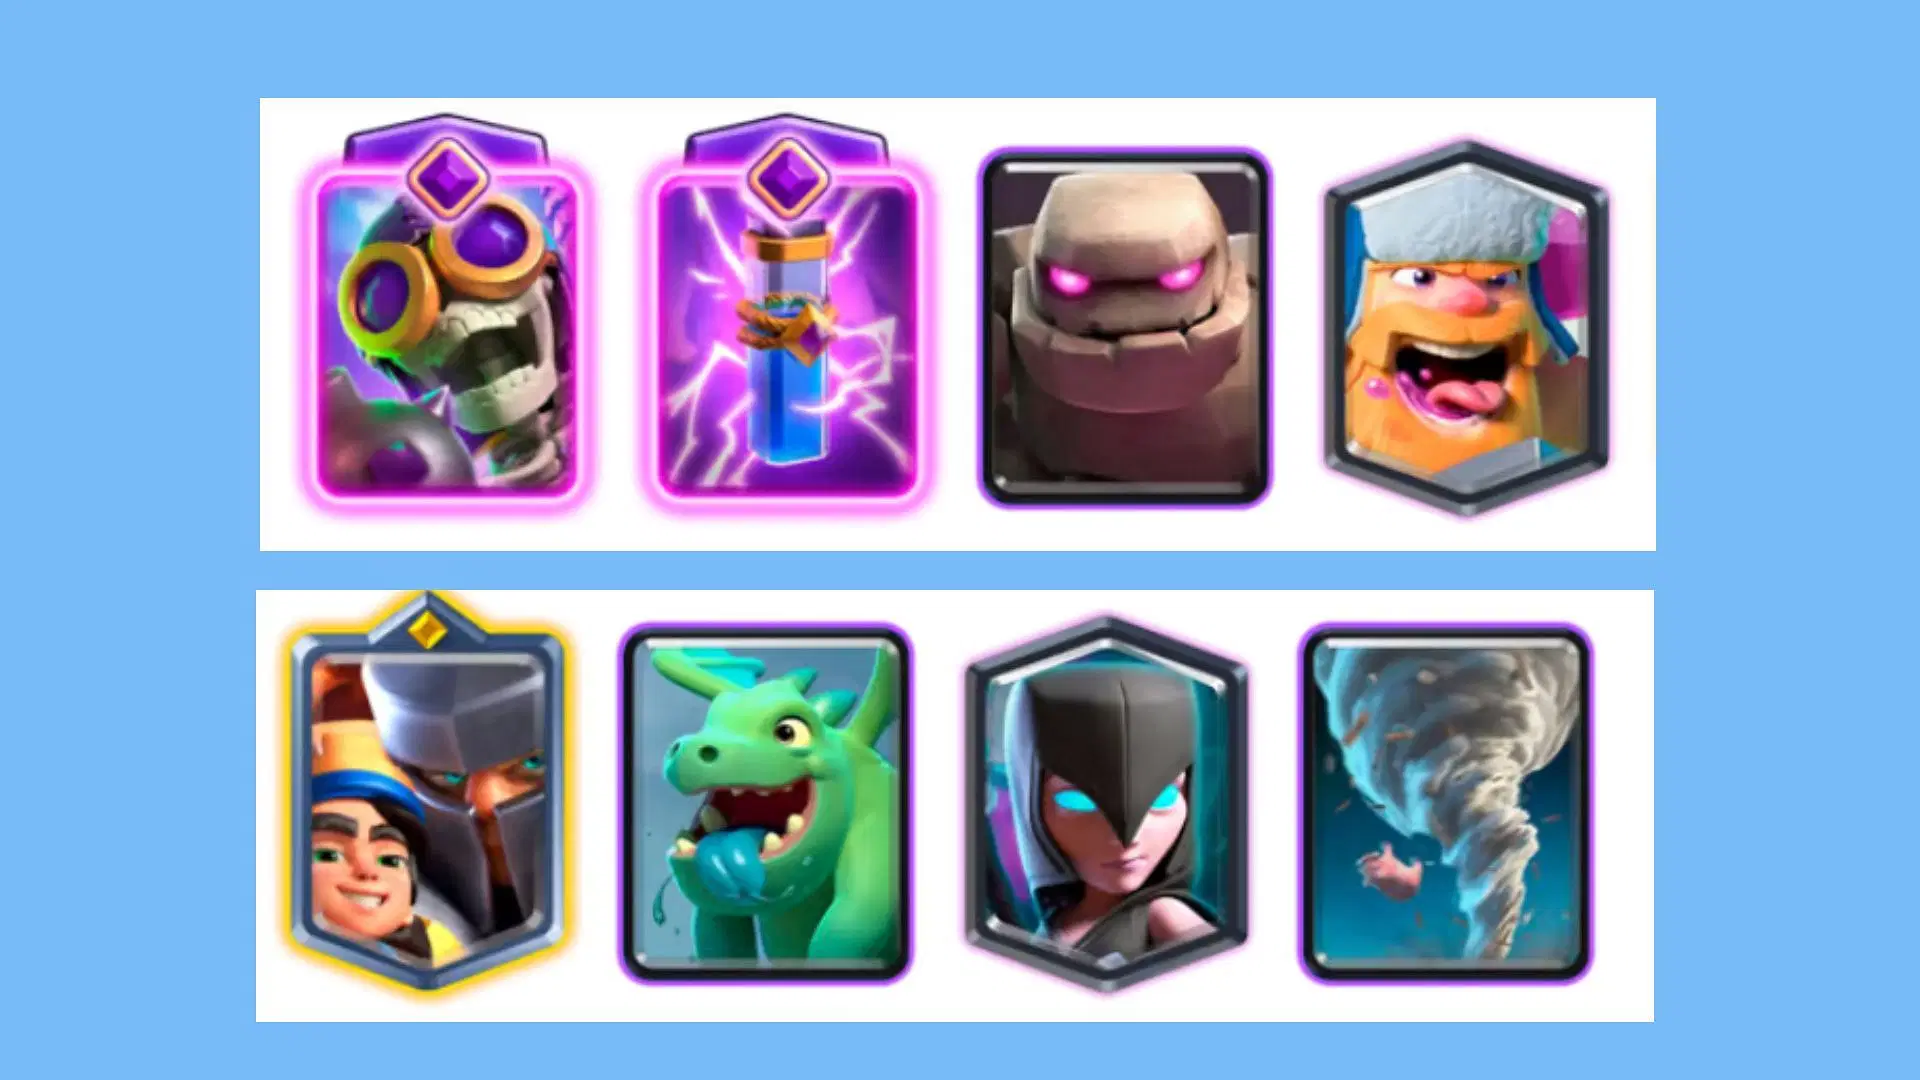
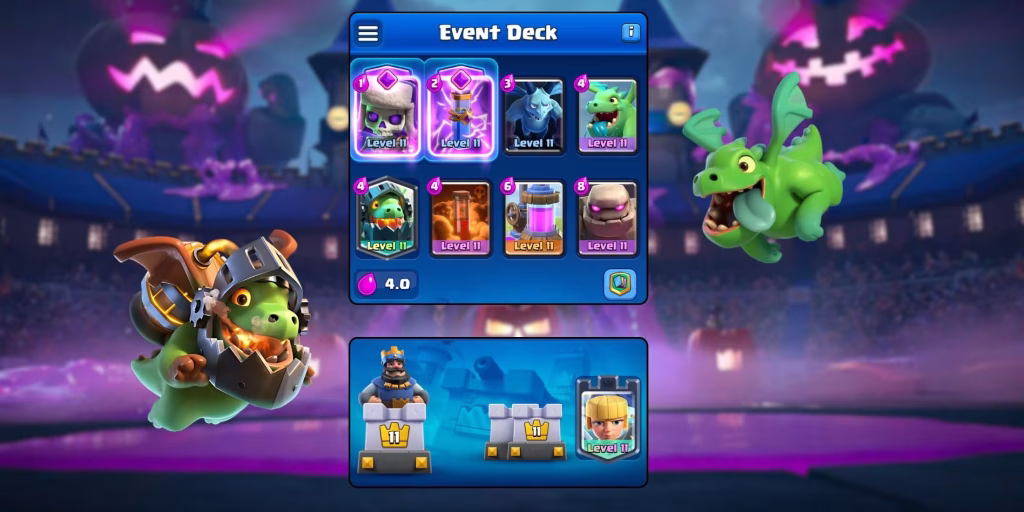
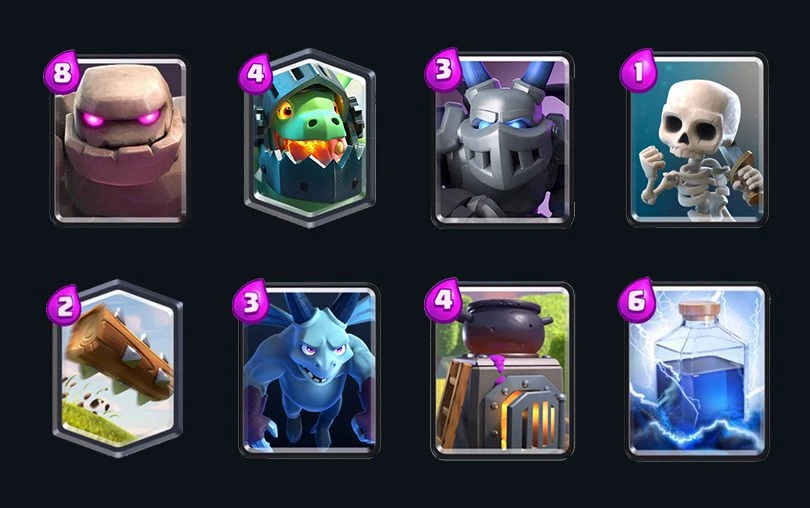
Support troops play an essential role in the success of a Golem Clash Royale push. Cards like Night Witch, Baby Dragon, Lumberjack, and Electro Dragon are popular choices due to their synergy with the Golem. The Night Witch, in particular, complements the Golem perfectly, spawning bats that deal chip damage while being shielded by the Golem’s massive health. The Baby Dragon provides splash damage from the air, clearing swarms and squishy troops that would otherwise distract the Golem Clash Royale. The Lumberjack adds a layer of unpredictability, dying early to drop a Rage spell that significantly boosts the attack speed and movement of your entire push. Electro Dragon adds control, stunning enemy troops and resetting Inferno-based defenses. The synergy between these cards and the Golem creates a compounding pressure that, if unaddressed, can easily dismantle any defensive setup.
Optimal Spell Choices In A Golem Deck
Spells are a key component in supporting the Golem Clash Royale and maintaining pressure on your opponent. Cards like Lightning, Tornado, and Bar Barrel are often staples in a well-rounded Golem deck. Lightning is especially useful for eliminating key defensive units like Musketeer, Electro Wizard, and Inferno Tower, all of which pose a significant threat to your Golem’s health. Tornado synergizes well with splash damage troops like Baby Dragon or Electro Dragon, allowing you to reposition enemy troops and eliminate them more efficiently. Bar Barrel, as a low-cost utility spell, can clear out small swarms and cycle through your deck, while also providing a temporary tank for defensive troops. Proper use of spells allows you to maintain momentum during a push, respond to threats efficiently, and make room for your Golem to do maximum damage.
Golem Deck Strategy: Early, Mid, And Late Game
The flow of a match when using a Golem deck is heavily influenced by timing and elixir management. In the early game, it’s essential to play passively and scout your opponent’s deck. Place troops in the back to cycle and defend without overcommitting. Dropping a Golem Clash Royale early can be risky unless you’re confident in your elixir lead. During the mid-game, you should start looking for opportunities to build small pushes or bait out your opponent’s key counters. You might use Night Witch or Baby Dragon to test their spells and defenses, giving you a clearer path for your Golem push later. The late game, particularly Double Elixir time, is where Golem decks shine. Here, you can afford to invest heavily in a Golem Clash Royale push at the back of your king tower, then stack multiple support troops behind it. With enough elixir, you can launch an almost unstoppable offense that not only takes a tower but threatens a complete three-crown victory.
Variations Of Golem Decks In Different Arenas
As players progress through the arenas, the Golem Clash Royale deck adapts to accommodate new cards and counters. In lower arenas, a simple combination of Golem, Baby Dragon, and Night Witch is enough to carry players to higher levels. As you reach mid-tier arenas, you’ll encounter more complex decks and will need to refine your Golem strategy with cards like Tornado, Electro Dragon, and mini-tanks like Dark Prince. In higher arenas and competitive ladder play, advanced Golem Clash Royale decks often incorporate Lightning, Lumberjack, and Tornado for maximum synergy and control. The deck’s composition can shift slightly based on the current meta, especially when dealing with popular counters like Inferno Tower, P.E.K.K.A, or cycle decks. Understanding your opponent’s common strategies in each arena level can help you pre-plan your moves and make smarter in-game decisions that tilt the battle in your favor.
Common Counters To The Golem And How To Beat Them?
Golem decks face specific challenges, particularly from high-damage single-target units like Mini P.E.K.K.A and P.E.K.K.A, Inferno Tower, and Inferno Dragon. These cards can melt through your Golem quickly if left unchecked. To counter them, you must support your Golem Clash Royale with distraction troops and spells. For example, using Electro Dragon or Electro Wizard can reset the Inferno Dragon’s charge, buying your Golem more time. Lightning can instantly eliminate Inferno Tower and Electro Wizard, while Tornado can clump defenders together for splash damage elimination. Additionally, swarm units like Skeleton Army or Bats can delay your Golem, so incorporating splash damage support like Baby Dragon or Bomber becomes crucial. Smart placement, elixir management, and proper timing are essential when dealing with these counters. Keeping track of your opponent’s rotation helps you predict when they’ll play a specific counter and prepare your response in advance.
Playing Against Fast Cycle Decks With Golem
One of the trickiest matchups for a Golem Clash Royale deck is facing fast cycle decks, especially those built around Miner, Hog Rider, or Royal Hogs. These decks can chip away at your towers while you attempt to build up a Golem Clash Royale push, punishing you for heavy elixir investment. To win against cycle decks, focus on tight, efficient defense and avoid committing to a full push too early. Use cheap defensive troops and spells to minimize damage during the early game. Once Double Elixir hits, your opportunity to counter-attack grows. If you’ve defended efficiently, you can place your Golem Clash Royale at the back and start building a monster push that cycle decks often struggle to handle due to their lack of strong defense. The key to beating fast cycle decks lies in patience, recognizing your opportunity windows, and maximizing the value of every elixir point spent.
Leveraging Elixir Advantage With Golem
Elixir management is the backbone of any successful Golem Clash Royale deck strategy. Because of the Golem’s high cost, mismanaging elixir can leave you wide open to counterattacks. Learning to recognize when you have a positive elixir trade is essential. For example, if your opponent uses a 5-elixir card and you defend it with a 3-elixir counter, you gain a 2-elixir lead, which you can use to begin your Golem Clash Royale push. Building up an elixir advantage through smart defense is the best way to set up a massive push that’s difficult to stop. It’s also important to identify when to split your elixir between pushing and defending. Experienced players often use a Golem push in one lane to bait out heavy defenses and then punish the other lane with support troops, effectively forcing the opponent to choose between two threats. Mastering elixir advantage takes time, but it is one of the most powerful tools in your arsenal when using the Golem deck.
Using The Golem Deck In Clan Wars And Tournaments
The Golem deck’s performance extends beyond ladder play into Clan Wars and tournaments. In Clan Wars, having a reliable Golem Clash Royale deck can give your clan an edge, especially in duels where consistency matters. Since Golem decks are less reliant on quick reactions and more focused on long-term strategy, they tend to perform well under pressure. In tournament formats where players only have limited attempts, the Golem deck’s ability to secure three-crown victories makes it a valuable choice. Players often prepare multiple Golem Clash Royale variants to adapt to specific rules, such as banned cards or reduced elixir generation. In competitive environments, success with the Golem Clash Royale comes from precise planning and adapting your playstyle to the format, whether it’s sudden death, draft mode, or traditional ladder.
Tips From Top Golem Players
Professional and top-ladder Golem players often emphasize a few key habits that separate average players from experts. They advocate for playing the Golem Clash Royale only when you have an elixir lead or during Double Elixir. They also stress the importance of scouting your opponent’s counter cards before committing to a push. Knowing when to Lightning versus when to hold it for value is a tactical decision that can decide the game. Top players often use troop spacing to avoid giving value to opponent’s splash damage spells and maintain pressure across multiple lanes. Watching replays and analyzing your mistakes is another pro tip that helps refine your decision-making and elevate your win rate with the Golem deck. Incorporating these habits into your gameplay will not only improve your skill with the Golem deck but also help you grow as an all-around Clash Royale strategist.
The Psychological Edge Of Playing Golem
Playing a Golem deck isn’t just about cards and elixir—it’s also about applying psychological pressure. When an opponent sees a Golem Clash Royale dropped in the back, it can trigger panic and rushed decision-making. By controlling the pace of the game and forcing your opponent to react to your moves, you take psychological control of the match. Knowing how to mask your intentions, bait out counters, and execute perfectly timed pushes can frustrate and break down your opponent’s rhythm. Bluffing with partial pushes or faking a full commitment can also lure out key defensive cards prematurely. Using the psychological aspect of gameplay in your strategy makes you a more formidable opponent, capable of not only outplaying but also outthinking your rivals.
Conclusion
The Golem Clash Royale deck stands as one of the most powerful and enduring strategies in the game, built around patience, timing, and devastating pushes that can crush even the most disciplined defenses. With the right support cards, smart elixir management, and adaptability to different matchups, the Golem deck becomes an unstoppable force in both ladder and competitive play. Whether you’re just starting out or looking to master one of Clash Royale’s classic archetypes, learning the ins and outs of the Golem deck offers a rewarding path to victory. Stick to the principles of beatdown, perfect your timing, and above all, enjoy the thunderous power of sending a Golem down the lane as your opponent scrambles to respond.